Volume & latency
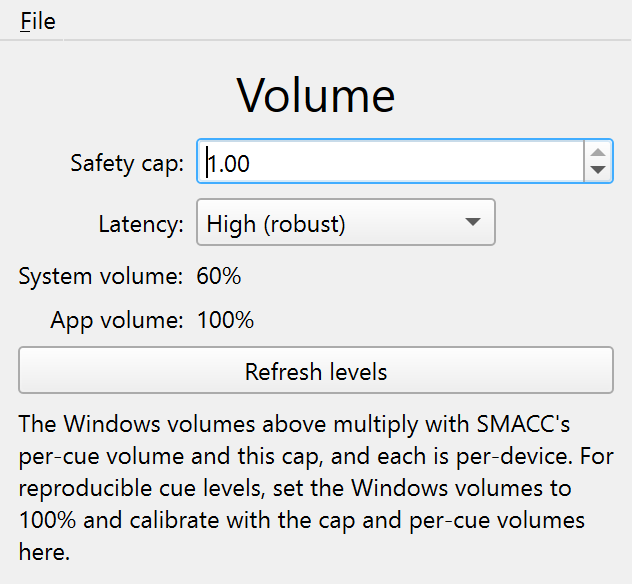
The Volume window holds two things that shape every cue: how loud it can get (the output safety cap and the visible OS volume stages) and the output latency setting. This page covers both.
Volume
On Windows, the level reaching the participant is a product of several controls:
per-cue volume × output safety cap × Windows app volume × Windows device volume × hardware knobThree of those live in the OS and are invisible from most apps. SMACC makes its own gain explicit and adds a safety limit, in the Volume window:
- Output safety cap. A single master ceiling, applied as the last gain stage on every cue and noise output. However loud an individual cue is set, the cap is a hard limit, so a full-volume looped cue on a calibrated rig cannot suddenly blast a sleeping participant.
- A read-only view of the Windows stages. The window shows the current System volume (the Windows output endpoint) and App volume (SMACC’s own level) in the Windows Volume Mixer, so the hidden OS stages are visible.
For levels that reproduce across nights and participants, set the Windows device and app volumes to 100%, then calibrate with the per-cue volumes and the safety cap inside SMACC. That way one place, SMACC, determines how loud a cue is.
Latency
How long is it from clicking Play (or firing a cue) to the participant actually hearing the sound or seeing the light, and how well does the event marker line up with it? This section answers that, shows how to measure it on your own rig, and explains what SMACC does to keep markers honest.
For the dream-engineering work SMACC is built for — cueing for lucidity or memory reactivation — absolute latency is rarely critical. A cue landing 20 ms early or late doesn’t change whether it reaches REM. What matters is that the marker lines up with the stimulus in the EEG, and there a constant offset is harmless (you can correct it after the fact) while jitter — random variation — is not. SMACC therefore optimises for predictable timing, not minimal latency.
What contributes
From the click to the sound, in order:
| Stage | Typical | Notes |
|---|---|---|
| Click → handler | < 1 ms | Qt event dispatch. |
| Decode + resample | a few ms | The cue is decoded when loaded; only the resample runs at play time. |
| Open the output stream | tens of ms | A fresh WASAPI stream is opened per cue (see #105). Affects click→sound, not the marker. |
| Output buffer | ~3–25 ms | The stream’s buffer: sound reaches the DAC about one buffer after it starts. This is the marker↔︎sound gap. |
| DAC → speaker → air | ~1–5 ms | Hardware + ~3 ms per metre of air. |
The two that matter are separate axes with separate fixes:
- Marker → sound (the science): the output buffer. SMACC corrects for this (below), and it’s what a per-rig measurement pins down.
- Click → sound (operator feel): dominated by the per-play stream open. Not a marker-alignment problem; tracked separately in #105.
The marker marks the software event, not the photons
By default an event marker is timestamped when SMACC fires it — which is before the sound leaves the speaker (by one output buffer) or, for a light, around when the device write completes. To keep the marker aligned with the stimulus:
- Audio cue / noise. SMACC stamps the marker (its LSL timestamp and the canonical log line) at the estimated onset — the moment it fires plus the stream’s reported output latency — so the marker tracks the sound rather than SMACC’s buffer, and stays put when you change the latency setting. The raw software-trigger instant is kept on a
DEBUGline in the log for audit. - Visual cue. The first frame is written to the device synchronously, and the marker fires right after, so it trails the photons by microseconds (BlinkStick) rather than leading them.
The correction uses the latency PortAudio reports. The residual — fade-in ramp, DAC, speaker, the Hue bridge — is small and roughly constant, but only a recording of the actual onset pins it down. If you need sample-accurate alignment, measure your rig (below) and apply the leftover offset; that per-session capability is tracked in #104.
Measured: a typical Windows rig
Run the bundled probe from the project (it needs no special hardware for this part):
uv run tools/measure_latency.pyOn a stock laptop (Realtek WASAPI shared-mode output) it reports:
Device:       Speakers (Realtek(R) Audio)
Sample rate:  48000 Hz
Reported:     low   3.0 ms   high  10.0 ms
Negotiated [ low]:  22.0 ms   (SMACC stamps the marker this far ahead of the stream start)
Negotiated [high]:  22.0 ms   (SMACC stamps the marker this far ahead of the stream start)
Two things to take from this:
- The negotiated latency (~22 ms) is what you actually get — not the smaller “reported” figure. SMACC corrects the cue marker by this negotiated value.
- On shared-mode WASAPI, the engine rounds up to its own period, so Low and High come out the same here. The Low setting only helps on devices/drivers whose buffer it can actually shrink; true low latency needs WASAPI exclusive mode, which SMACC doesn’t use today. Don’t assume Low helps — measure it.
The Low / High setting
The Volume window has a Latency choice (High / Low), saved in the .smacc (output_latency):
- High (default) — PortAudio’s robust buffer. Fewer underruns; the safe choice for an overnight looping cue, where a glitch in a sleeper’s ear is worse than 20 ms.
- Low — asks for a smaller buffer. Trims the marker↔︎sound gap where the device allows it (often no change on shared-mode WASAPI). It applies to the next cue or noise played, not the one currently sounding.
Because the marker is corrected by the negotiated latency, switching High/Low never silently shifts your markers — the correction tracks the setting.
Visual cues: BlinkStick vs Hue
Light latency depends entirely on the backend:
- BlinkStick — a USB-HID write, a few milliseconds. Fast enough that the marker effectively coincides with the light.
- Philips Hue — each command is an HTTP call to the bridge (~100 ms) plus the bridge→bulb hop, and the bridge rate-limits, so Hue is unsuitable for tight timing or flashing (SMACC refuses
flashon Hue for this reason). Fine for slow ambient cues; don’t time-lock analyses to a Hue marker without measuring it.
Measure it on your own rig
The numbers above are specific to one machine — don’t quote them for a different rig. To characterise yours:
Round-trip, on the bench. Couple the output back to an input (a loopback cable, or a microphone at the speaker) and run:
uv run tools/measure_latency.py --loopback --repeats 30It plays tone bursts, hears them back, and reports the distribution. Watch the jitter (the spread), not just the mean.
Against the EEG, per session (authoritative). Record the real stimulus onset on a spare amplifier channel — a microphone for the cue, a photodiode for the light — alongside the LSL port code. The difference between the port code and the recorded onset, across the night, is the true distribution. SMACC does not plot this itself yet; a per-session view of it needs a spare channel and is tracked in #104.
You might hope to read latency straight from the log, since it records both the raw trigger time (DEBUG) and the corrected onset (INFO). But their difference is just the latency SMACC added — a constant, not a measurement. A real distribution needs an independent observation of the stimulus, i.e. the methods above.
If you want it lower
In rough order of effort: prefer short, sharp-onset cues (a long fade-in is its own latency); try the Low setting and measure whether your device honours it; keep the machine unloaded at night. A persistent pre-warmed stream (#105) and WASAPI exclusive mode would cut more, but neither is a SMACC goal today — for lucidity and TMR cueing, predictable beats fast.